

Wednesday, 15 February 2012
Wraithseer, Wraithlord and the Avatar of Khaine
Seems like a lot of you Flickr people like that Monstrous Creatures picture showing an Eldar Wraithseer, Wraithlord and the Avatar of Khaine, with a few other forces in the Background. I spotted some shadow spectres, a Wraithguard (Took me a while to spot him though...), Striking Scorpions, Warp Spiders, Eldar Jetbikes and an Autarch on his Jetbike...

That pictures and some others taken during this Apocalypse game, the so-called "Apoca-fez" can be seen on Flickr at: Apoca-Fez January 2012


Sunday, 12 February 2012
Eldar Phantom Titan - On the Table
Quick update on the Phantom Titan progress. Not finished yet but good enough to get into battle. a few friends and I had this little game at Warhammer World last month (January 2012 then). 209,000 Points. I managed to bring 11,000 points of Eldar, including the Phantom Titan...

More pictures of the Epic day on that other Flickr Photostream:
http://www.flickr.com/photos/brigu/
A few pictures of the building process. In this picture, we have a good view of the base. I used a terracotta flower pot saucer, Pouring a 1 Kg of resin in it. Using Terracotta is important as the resin reaction when mixing the product is highly exothermic. I could feel the heat through my Heavy gloves. Was a bit of an issue to remove the base from the Saucer, so I simply used a good ol' Hammer. On the picture we can see some bits left. Well, part of the scenery now.
 I used 4 mm brass rods in the legs and Hips. Hips always an issue for me, so here it's pinned, green stuffed, glued and I won't touch it any more. For transportation issue, that part is detachable from the base and fits into a GW or KR case. The whole model, including the base can be carried in 2 cases. I'll post some pictures of the model in his cases.
Next was the upper body, the easy part frankly. The focus here was to give him an attitude, working in line with the legs dynamic.

Then the fins and the arms, that was tricky bit. The shoulder especially. To make it sturdy but still able to be carried in a box, I worked the fin and shoulder as a single part. The fin is pinned into the body and detachable at will. the weapon is itself detachable from the arm.
Tip here is to make sure the fist is not glued in case you would like to be able to swap it for the mighty blade. I wanted to use a big magnet for the barrels of the guns but that definitely is too heavy. I ended up pinning and gluing both gun barrel (they're huge!)

Detail of the Torso, the gun is pinned, again, for transportation reason and so to be able to swap both weapon choice.

On this picture we can see where the main weapon get into the arm, just using 2 huge pins. It's very simple indeed.

Now for the paint Job. I have the overall idea. Not sure yet for the Guns, that's why they're still dull red. the body paint is final though. Face mask has been painted as we can see on the first picture. The base has received a prime and a few scenery elements. Shoulder Missiles need some painting and the pilot of course will be worked out too.
In conclusion, lots to do still but it was certainly a lot of fun already along with the Apolcalypse game itself.
The story begins here:
http://www.monstrouscreatures.com/2011/04/eldar-phantom-titan-part-i-delivery.html

Picture courtesy of Tagule's photostream on Flickr
More pictures of the Epic day on that other Flickr Photostream:
http://www.flickr.com/photos/brigu/
A few pictures of the building process. In this picture, we have a good view of the base. I used a terracotta flower pot saucer, Pouring a 1 Kg of resin in it. Using Terracotta is important as the resin reaction when mixing the product is highly exothermic. I could feel the heat through my Heavy gloves. Was a bit of an issue to remove the base from the Saucer, so I simply used a good ol' Hammer. On the picture we can see some bits left. Well, part of the scenery now.

Next was the upper body, the easy part frankly. The focus here was to give him an attitude, working in line with the legs dynamic.

Then the fins and the arms, that was tricky bit. The shoulder especially. To make it sturdy but still able to be carried in a box, I worked the fin and shoulder as a single part. The fin is pinned into the body and detachable at will. the weapon is itself detachable from the arm.
Tip here is to make sure the fist is not glued in case you would like to be able to swap it for the mighty blade. I wanted to use a big magnet for the barrels of the guns but that definitely is too heavy. I ended up pinning and gluing both gun barrel (they're huge!)

Detail of the Torso, the gun is pinned, again, for transportation reason and so to be able to swap both weapon choice.

On this picture we can see where the main weapon get into the arm, just using 2 huge pins. It's very simple indeed.

Now for the paint Job. I have the overall idea. Not sure yet for the Guns, that's why they're still dull red. the body paint is final though. Face mask has been painted as we can see on the first picture. The base has received a prime and a few scenery elements. Shoulder Missiles need some painting and the pilot of course will be worked out too.
In conclusion, lots to do still but it was certainly a lot of fun already along with the Apolcalypse game itself.
The story begins here:
http://www.monstrouscreatures.com/2011/04/eldar-phantom-titan-part-i-delivery.html
Monday, 16 January 2012
Grey Knights, a digression from the Eldar Path...
The Phantom Titan is doing well and should be finished on time for our big Game this coming week-end. After this I will post some Picts and How-To, especially on the Base and the Pinning.
In the mean time, I've been painting a few Grey Knights because, because.. mmm, No, I can't find any reason. It all started when Fred, from Fred's Warhammer Stuff offered me a few models he spotted on an auction. I thereafter bought Draigo as I like the model and subsequently bought a Dreadnight just because I'm a huge Alien 2 fan.
Anyway, here's the result:


... That's it for now, thank you for watching.
In the mean time, I've been painting a few Grey Knights because, because.. mmm, No, I can't find any reason. It all started when Fred, from Fred's Warhammer Stuff offered me a few models he spotted on an auction. I thereafter bought Draigo as I like the model and subsequently bought a Dreadnight just because I'm a huge Alien 2 fan.
Anyway, here's the result:


... That's it for now, thank you for watching.
Tuesday, 25 October 2011
Eldar Shadow Spectres with Exarch
A few Shadow Spectres with their Exarch. Not the best Paint Job ever but I had a good time painting them.
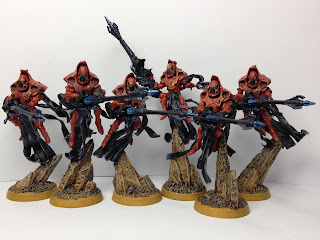
Recipe:
-From a white primer
- Armor Merchrite Red, quick Blood Red on top, Dry Brush of Scab Red, Edge highlighted first with a Blazing orange/Yellow/White mix on the orange side, a second time with a whiter mix.
- Reactors are Badab black washed (front and rear events)
- Ribbons, Loincloth, Chaos Black, Highlight Codex Grey
- Face Mask, Chaos Black
- Rifle Chaos Black, Prisms are then Dry brushed on the edges with Regal Blue, then Enchanted Blue, Ice Blue and Skull white, used some gloss for the finish. Vanes on the side received a Mithrill Silver dry brush following by a wash of Asurmen Blue.
- Stone/Base is Wash Sepia, Wash Devlan Mud, Liberal paint of Tausept Ochre, Dry Brush of Bleach bone to finish
- Gems are Dark Angel Green, Goblin Green, Scorpion green with a white skull dot.

Recipe:
-From a white primer
- Armor Merchrite Red, quick Blood Red on top, Dry Brush of Scab Red, Edge highlighted first with a Blazing orange/Yellow/White mix on the orange side, a second time with a whiter mix.
- Reactors are Badab black washed (front and rear events)
- Ribbons, Loincloth, Chaos Black, Highlight Codex Grey
- Face Mask, Chaos Black
- Rifle Chaos Black, Prisms are then Dry brushed on the edges with Regal Blue, then Enchanted Blue, Ice Blue and Skull white, used some gloss for the finish. Vanes on the side received a Mithrill Silver dry brush following by a wash of Asurmen Blue.
- Stone/Base is Wash Sepia, Wash Devlan Mud, Liberal paint of Tausept Ochre, Dry Brush of Bleach bone to finish
- Gems are Dark Angel Green, Goblin Green, Scorpion green with a white skull dot.
Sunday, 21 August 2011
Eldar Phantom Titan - Part II - The Cleaning
Quick update on the Eldar Phantom Titan. It's now been cleaned and primed. I received the special long drills I ordered so I will be able to insert those long 3mm brass rods I have. I also received the resin kit so I can mold the base, none of the hobby site I know being able to provide quite what I wanted.
Until more pics of the current assembly, here's some pictures of the soap cleaning just giving an idea of the cheer amount of pieces involved here.

Next:
http://www.monstrouscreatures.com/2012/02/eldar-phantom-titan-on-table.html
Until more pics of the current assembly, here's some pictures of the soap cleaning just giving an idea of the cheer amount of pieces involved here.

Next stage, base and foot
Next:
http://www.monstrouscreatures.com/2012/02/eldar-phantom-titan-on-table.html
Subscribe to:
Posts (Atom)